Step by step instructions for submitting 3dsMax jobs with Qube!
You will need to have installed the 3dsmax jobtype. If you see a Qube! menu item in the top menu bar, the jobtype is already installed, and you can move to Step 2.
Installation:
If you are not familiar with the installation process please refer to the Quickstart section on installing workers, or to Installing Jobtypes. <if this doesn't exist, it should> You will need to select "3dsmax Jobtype" during the installation process .
Once installed you should be able to locate the "Qube!" menu in 3dsMax
InApp Location:
File Menu -> Qube!
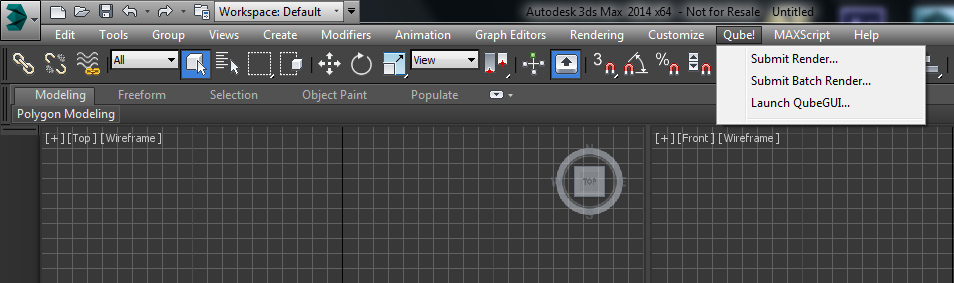
With a scene loaded in 3dsMax choose "Submit Render...".
Note that you could also choose "Submit Batch Render..." depending on your requirements.
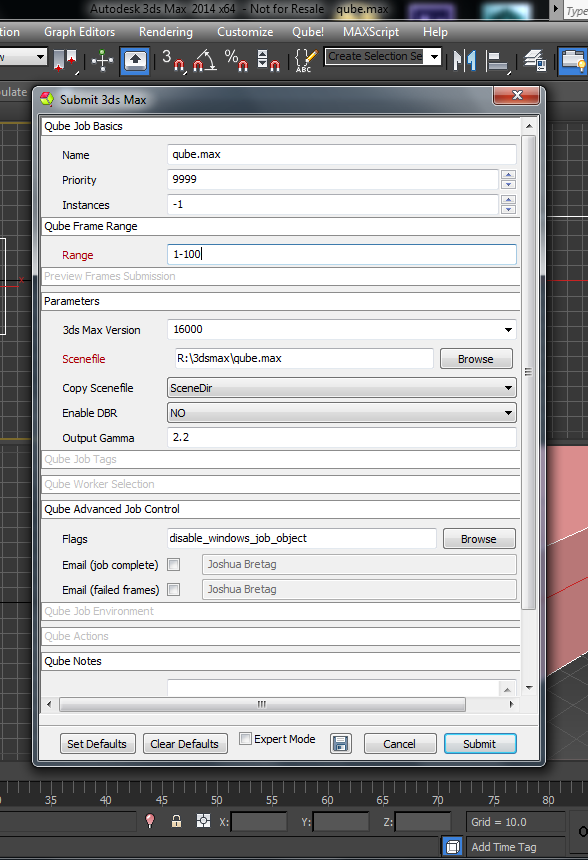
This will present a pre-filled submission UI like the one here.
Ensure sections marked in red have the correct details
Click submit

For further details on the submission UI look in the right panel
Job Submission Details
Click here for details...
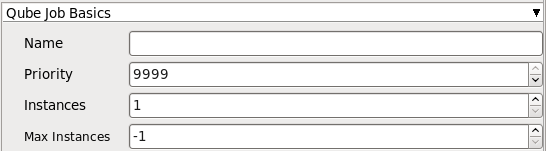
Name
This is the name of the job of the job so it can be easily identified in the Qube! UI.
Priority
Every job in Qube is assigned a numeric priority. Priority 1 is higher than priority 100. This is similar to 1st place, 2nd place, 3rd place, etc. The default priority assigned to a job is 9999.
Instances
This is the number of copies of the application that will run at the same time across the network. The combination of "Instances=1" and "Max Instances=-1" means that this job will take as much of the farm as it can, and all jobs will share evenly across the farm.
Examples:
On a 12 slot(core) machine running Maya if you set
"Instances" to 4
"Reservations" to "host.processors=3"
Qube! will open 4 sessions of Maya on the Worker(s) simultaneously, which may consume all slots/cores on a given Worker.
if you set
"Instances" to 1
"Reservations" to "host.processors=1+"
Qube will open 1 session of Maya on a Worker, consuming all slots/cores ("host.processors=1+" is used for all slots/cores).
Max Instances
If resources are available, Qube! will spawn more than 'Instances' copies of the application, but no more than 'Max Instances'. The default of -1 means there is no maximum. If this is set to 0, then it won't spawn more than 'Instances' copies.
More on Instances & Reservations & SmartShare Studio Defaults

Click here for details...
Range
Frame range for the job (e.g 1-100, or 1-100x3, or 1,3,7,10). Most jobs require a frame range to execute on the Workers. You can set this range in a few different ways :
- "1-100" will just render the range between 1 and 100
- "1-100x3" will render every 3rd frame in the range 1 to 100; 1, 4, 7, ..., 94, 97, 100
- "1,3,7,10" will only render the selected frames 1,3,7,10
rangeOrdering
Order to render the items. (Ascending=1,2,3,4,5...,Descending=10,9,8...,Binary=first,middle,last...) You can set the order in which your frames are rendered. The drop down options are:
- "Ascending" - this will render the frames counting upwards from your start frame
- "Decending" - this will render the frames counting backwards from your end frame
- "Binary" - This will render the first, last, and middle frames of the range, then the middle frame of the first half and the middle frame of the second half, and so on. This is useful for sampling the frames in the sequence to make sure it is rendering correctly.
Click here for details...
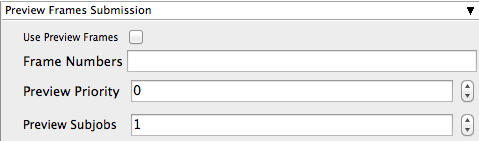
Use Preview Frames
Enabling preview frames will create 2 jobs:
- A primary dependent job with a higher priority that will render the selected frames first
- A secondary job with lower priority that will render the remaining frames. This will return the selected frames faster so that you can check the accuracy of your renders.
Choose the frames that you wish to render first. If left blank the default is to render the first frame, the last frame and the middle frame in that order. You can select specific frames by adding comma separated frame numbers e.g 1,2,10,15,75, or a range with, e.g., 1-100x5 (1 to 100, every 5th frame)
Preview Priority
Choose the priority for the preview job. This can be set by the site admin.
Preview Subjobs
Choose the number of instances / subjobs for the preview frames. By default, this is equal to the number of preview frames - that is, it will try to do all the preview frames at the same time.
Note that when you submit a job with preview frames enabled, it will actually submit 2 jobs—one with the preview frames list at a higher priority, and another with the rest of the agenda, at the normal priority (as specified in the job's Priority field). You will get, consequently, 2 job IDs for the submission.
Parameters

Click for Detailed Explanations
3ds Max Version
Sets the version of 3d Studio Max on the worker. You may also use numeric version numbers, such as "13000" for v2011, "10000" for v2008, "9000" for v9, etc.
3dsmaxcmd
Browse for or enter manually the location of 3dsmaxcmd.exe on the worker - e.g. C:/Program Files/Autodesk/3ds Max 2011/3dsmaxcmd.exe
Scenefile
Browse or enter manuall the location of the scene file to be rendered. This is a required field for submission. Important: Best practice is to ensure the scene file and all of its dependent files such as textures are on network storage accessible by the workers.
Copy Scenefile
Tooltip - Whether or not every subjob should create and work with its own copy of the scenefile to workaround a 3dsmax limitation. Explanation needed.
Output file
Browse for or manually enter the location of the output file you wish to generate. Important: Best practice is to ensure outputs are written to network storage accessible by the workers.
Enable DBR
Enable DBR for mental ray or V-ray. See also How to use the mental ray Distributed Bucket Render (DBR) or V-Ray Distributed Render (DR) feature with Qube!
Output Gamma
Manually set the image gamma without opening 3ds Max
TIF Alpha
Manually set the alpha-channel without opening 3ds Max
Disable Output Check
Ensures that the 3dsmax filecheck is not enabled
Use Legacy Mode
Use legacy mode (required for 3ds Max prior to v2008. Will not work for v2013 and above). Only required if running 3ds Max < 2008